Sencha Cmd, how to setup an Ext JS app based on Neptune theme
In this article I will show how to setup an Ext JS app with Sencha Cmd (version 4.0.1.30) and a custom theme based on the Ext JS neptune theme. I have followed the Sencha Ext JS 4.2.2 Theming from the Sencha website and to make things a bit easier I have summed it up in a few easy steps.
I am not using a workspace and generate the app directly. The name of the app we are setting up is called MopedCollection (what's in a name).
The names MopedCollection and moped-collection-theme have to be modified to your own needs.
Windows 8.1
The following steps assume a PC/laptop with Windows 8.1 installed. And notice is demanded about the fact that apps generated with different Sencha Cmd versions are not compatible
If you had previously 4.0.1.30 installed and you would like to go back after an upgrade, you can try:
Enter:
Surprisingly it reinstalled a beta release from cdn.sencha.com/cmd/beta/4.0.1.30/.
When this succeeds you have to modify the system values in Windows. You can do this by going to System in the control panel and click on Advanced System Settings. Then click on the button Environment Variables. In the System Variables change the value of Path and SENCHA_CMD_3_0_0 to the right version of Sencha Cmd. Close any open DOS command dialogs and reopen them again to load the modified system variables.
Sencha watch limitations
Sencha Cmd folder "watch" does also not work on a Samba shared folder on a Linux server. This could be installed in f.e. VMWare Workstation/Player. The Sencha app watch" command will end in a The network BIOS command limit has been reached error. You can watch this folder on the VMWare installed Linux server, but it requires that you have the same Sencha Cmd version installed as on your Windows PC.
But not with Debian Wheezy
With Debian Wheezy it didn't work, because it resolved in Java runtime errors. This is possibly because of the fact that Debian has an OpenJDK (free Java license) and has banned the Oracle JDK from its distribution.
Alternatively you could install a local Xampp Apache on your PC where you have local access with your Windows PC to the www publication folder. The internal phantomjs web server that comes with Sencha Cmd is a very lightweight web server for testing Sencha build apps.
To test your app locally with the phantomjs internal web server.
Enter:
or:
Start the web server in the root of your project (f.e: c:\MopedCollection). As in the path that has the generated app you are going to create in the following steps.
To open 2 Dos command dialogs at the same time, you can run one as normal and one as administrator.
You can then access your app from the web browser wit url: http://localhost:xxxx.
The web server is automatically stopped when the DOS command dialog is closed.
Closing the web server with the command
also leads to a connection refused error.
Requirements for using Sencha Cmd
- Install Ruby for Window from: http://rubyinstaller.org/downloads/ and install the latest version.
- Install Sencha Cmd from: http://www.sencha.com/products/sencha-cmd/download. I have version 4.0.1.30, for version 4.0.1.45 didn't show any feedback in my DOS prompt.
- Install Ext JS from: http://www.sencha.com/products/extjs/download/ and it is helpful to unzip it in the root of your c: drive. This avoids some typing when entering the Sencha CMD statements. (like Ext-4.2.2).
- Make sure to have the proper JAVA SDK installed:
Type "java -version" from the DOS prompt to check this.
java version "1.7.0_45"
Java(TM) SE Runtime Environment (build 1.7.0_45-b18)
Java HotSpot(TM) 64-Bit Server VM (build 24.45-b08, mixed mode)
Download it from here: http://java.com/en/download/index.jsp
Steps
Go to the root of the folder where you want to put the app. This doesn't have to be on the same drive where you have installed Sencha CMD. Don't create the app folder manually, Sencha CMD will do this automatically.
Enter:
- -sdk c:Ext-4.2.2 = location of your ExtJS distribution
- MopedCollection (first) = name of your app
- MopedCollection (second) = path to your app
In this sample, if you are in c:\mydir, the application will be installed in c:\mydir\MopedCollection\.
Enter:
Enter:
Extending the Neptune theme
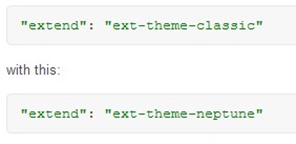
For this tutorial we will create a custom theme that extends the Neptune theme.
To do this, replace the following line in "packagesmoped-collection-themepackage.json":

Configuring Global Theme Variables
Now that you have set up your theme package, its time to begin modifying the visual appearance of the theme. Let's start by modify the base color from which many Ext JS Components' colors are derived.
Create a file called Component.scss in "moped-collection-themesassvar".
Add the following code to the Component.scss file:

Don't reload your app yet in your browser, cause nothing has changed yet
Enter:
Enter:
Enter:
Edit the sencha.cfg file:
Enter:
Enter:
Enter:
Reloading the app in a browser will show all the changes with the new theme
Sencha watch, watching the file system
Enter:
Enter:
To efficiently maintain all of the information, Sencha leverages Java 7’s ability to monitor the file system for changes. Based on this functionality, app watch monitors the following:
- Application source code (the “app” folder).
- Application Sass code (the “sass” folder).
- Application resources (the “resources” folder).
- Theme package source, Sass and resources (“src”, “sass” and “resources”).
- The source, Sass and resources folder for the theme’s base themes.
- The source, Sass and resources of all packages required by the application (in “app.json”).
- The source, Sass and resources of all packages required by other packages (in “package.json”) including theme packages.
Sencha watch can be used to monitor your app directory for modifications and have Sencha CMD do the work while you develop the app in your editor.
You can read more about it here: http://www.sencha.com/blog/using-the-new-app-watch-command-in-sencha-cmd-4.

 _
_


