In the first part of we ended with the setup screen for the Debian installation on a newly created virtual machine. Now we are going to do the installation itself. We are assuming that we will our server as webserver and mysql server. Be aware that our installation is for a development server in-house. This article is not a Linux manual, so always inform the proper sources for all your own required settings and securities.
If you have not read the first article you can read it here: link

Installation Debian Wheezy walkthrough
We are going to install (lazy) a graphical install for I am not a great expert in the command line myself, so I love to have a graphical (more resources required) environment. But let's not be purist here.
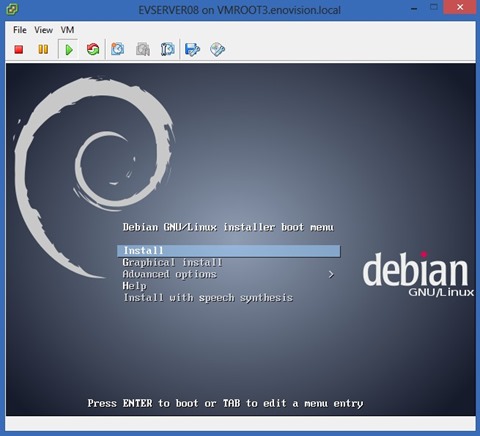
The difference between the Install and Graphical Install is that the first one is doing a text based install like the image shows below (which is a bit faster) and the Graphical install does it as shown in this instruction. The Graphical install has no influence on if you are going to install a desktop GUI or not!
By default the system is installing the Gnome graphical desktop environment (GUI). If you would like to have another environment go the Advanced options. Here you can select another graphical environment like KDE or Xfce or XLDE. All have their charmes and some of them are more leightweight for your system. Gnome doesn't work very well with VMware and a limited graphical card, so you could select Xfce or XLDE, which have a lower demand. In our instruction we have selected the XLDE desktop environment.
The image below shows the standard install displays (non-graphical).
Select from the display shown Graphical install and wait for the following dialog.
Now select your language (default English) en press Continue.
Now select your country, if you are in Europe and your country is not listed you press other. Now follow the options on the following displays to select your country.
Select your locale and press Continue.
Select your keyboard layout and press Continue. The installation will now continue with loading components from the CD. This can take a while. By default DHCP is configured, this has to be changed after the installation. You don't want a server with a IP-address that can change once in a while.
On the following dialog we have to give the system its name. Give an appropriate name and press Continue. On the following display you enter your domain name. For the intranet you can enter here the domain of your local network. After doing so, press Continue.
On the next dialog you have to enter the password of the "root" user (admin) of the system. You have to do this twice. After this you press Continue again.
By default you can't login to your Debian server with the "root" user. So you have to enter a second user here. This is a user that has no access to "root" owned files. So that is somewhat unhandy. Follow the link below on how to enable the "root" user after the installation of the server. After entering a user here you press Continue. You will now have enter the password twice and also then Continue.
The installation will now continue to load some more files from the CD.
On the following display you have to tell where the system is going to be installed on the disc (partition). If you have a dedicated server then you just press Continue. Also on the next display you continue by pressing Continue. You do the same on the next display. The system will now use the whole disc.
After this you should see something that looks like this. Now press Continue.
On the following display you have to select Yes and press Continue.
The installation continues with installing Debian files. This can take some time depending on the speed of your internet connection.
Now select the mirror where the installation take the packages to be downloaded from. Press twice on Continue.
Now you can add some proxy information, if you are using a proxy server. If you don't you leave it as it is. Press Continue. Now you can sit back and just let the process do the work.
After a while....
Press Continue.
Now you have to select what should be installed. Just select what you need, but remember that the SQL database is not MySQL, but PostgressSQL. MySQL can be installed after the installation. To have the graphical GNOME environment (and not only the prompt) you should NOT deselect the Debian desktop environment. After the selection press Continue.
Press Continue to install the GRUB boot loader.
Depending on the number of packages you have selected it can't take a while before the installation is finished. Now it is time to reboot and tune the installation.
After the restart your display requires a login. You can't login with the root user. So you have to use the alternate created user.
After the login you will have your "Windows" GUI. And you can start modifying your system to your own demands. The display below already has some icons put on the desktop after installing a few additional packages.
To install extra packages, or remove them, you can use the Synaptic Package Manager which you can find under the option Preferences in the Start menu left below.
 You still have to install the MySQL package. Below you find some more interesting packages to install. If you plan to use installation as a server I recommend to install as little as possible.
To remove Libre Office you open the root terminal and enter:
sudo apt-get remove --purge libreoffice* sudo apt-get clean sudo apt-get autoremove
Additional packages to install/uninstall
Gedit - The default editor for Gnome. xxx
MySQL - database management
MySQL Workbench from Oracle.
If not required uninstall things like LibreOffice, Games


